
You're standing in the kitchen with a coffee in hand, refreshing your listing on your phone, and the first thing that hits you isn't the price, it's the photo. In Greater Vancouver, that first image has to do serious work fast, because buyers are comparing condos in downtown towers, townhomes in Burnaby, and detached homes in North Vancouver before they've even read your description. If the photos look flat, dark, or rushed, the listing gets skimmed and forgotten.
That's why professional real estate photography isn't a nice-to-have in this market. It's the front line of your marketing, and in a place with tight competition, cloudy weather, and buyers who live on Realtor.ca and MLS alerts, the visuals often decide whether you get showings or silence. The money you spend on photos is tiny compared with the money you lose when a listing sits. For Vancouver sellers, that's especially true because carrying costs are real, and time on market is expensive.
A North Vancouver owner lists on Thursday night, or a downtown condo seller goes live before the weekend, and the phone starts lighting up. Buyers have not toured the home yet. They have seen the hero image, the first shot in the gallery, and decided in seconds whether the place deserves a click. That first weekend matters because online shopping is how homes are browsed now, and the trend solidified in the 2010s, with NAR's Profile of Home Buyers and Sellers finding that 95% of buyers used the internet to search for homes. That shift turned listing photography into the thing that drives the first reaction, not the last one Matterport's summary of home-buying photography stats.

Outside first. Curb appeal enhanced, bins out of sight, vehicles moved, and exterior lights on. Those four items do more than a decorative sweep, they set the tone before the buyer scrolls to the next photo.
Inside, keep it simple. All lights on, blinds and curtains open, and clutter removed from every visible surface. In the kitchen, counters clear, sink empty, and appliances clean. In bathrooms, toilets flushed and lids down, counters clear, and towels neatly folded.
Bedrooms need special discipline because they show badly when they're half-done. Make the beds properly, tuck away cords, and use soft neutral linens if you've got them. Turn off televisions, hide remotes, and remove anything personal that pulls attention away from the room itself.
A two-bedroom condo in downtown Vancouver has less margin for error than a detached house. One stray backpack, one drying rack, or one overloaded counter can make the space feel smaller on camera than it does in person. That's not a photographer problem; it's a prep problem.
The best way to manage it is to assign the prep to specific people. One person handles the exterior, one handles the kitchen and bathrooms, and one walks through the home with a final eye for odd items that didn't get put away. If you want a practical seller timeline, the prep sequence in this Vancouver house-sale guide is a useful reference.
Cleaners should go in the morning, the stager mid-day if you're using one, and the photographer later in the afternoon for exteriors. In BC weather, twilight exteriors may need to wait for the next clear evening. That delay is annoying, but it's better than forcing a bad shot because the sky won't cooperate.
The old advice says wider is always better. In Metro Vancouver, that's wrong often enough to hurt you. A lens can make a room look bigger, but if it stretches doorways, distorts corners, and turns a small condo into something that feels fake, experienced buyers notice immediately.
A 700 sq ft Yaletown condo benefits from honest mid-wide framing that shows layout without exaggeration. A 3,200 sq ft West Vancouver detached can carry a wider look because the room scale and property type can support it. That difference matters because buyers are comparing listings side by side, and trust usually wins more showings than a photo that feels slightly larger but a bit off.
The problem with aggressive ultra-wide shooting is simple. It can make rooms feel inflated, but it can also trigger skepticism, especially in condos and townhomes where buyers already know the floor plans are compact. If the hallway looks longer than it is or the bedroom door frame bends, the buyer stops trusting the set.
Use the widest angle you need to show flow, then include at least one eye-level reference shot in each room. That gives buyers a sense of scale without overpromising space. It also helps the listing feel grounded, which is exactly what higher-intent buyers want when they're comparing three or four similar homes in the same neighbourhood.
The right answer depends on the property. For a townhouse with a narrow main floor, a measured framing choice keeps the living area believable. For a larger detached home with open sightlines, a bit more width is fine because the structure can support it. The goal isn't to chase the biggest-looking image, it's to make the layout understandable and credible.
Before you book anything, make three decisions. Pick the package that fits the property type, choose a Vancouver media team that can handle weather reschedules, and prepare the home using a checklist instead of guessing on the morning of the shoot. That's the difference between a listing that launches cleanly and one that needs fixing later.
Use a one-page listing photography brief for every property. It should cover shot count, deliverables, usage rights, and timeline, and it should go to any photographer you're considering before the booking is confirmed. That brief keeps everyone aligned and stops vague promises from becoming expensive misunderstandings.
For sellers who want a wider marketing plan, the broader strategy framework in this Vancouver marketing guide is worth reading alongside your photo plan. Photography works best when it supports the pricing, timing, and launch sequence, not when it's ordered in isolation.
If you're selling in Vancouver, North Vancouver, Burnaby, Richmond, or on the Westside, book a listing consultation that includes photography, drone, twilight, and 3D walkthrough options matched to your property. The consultation should also include a comparable-sales and marketing review so the visual strategy fits the price and the timing, not just the camera budget.
Jacky Levi - Sotheby's Realty Advisor & Realtor offers listing strategy, marketing execution, and hands-on seller guidance across Greater Vancouver, including photography, video, and property presentation. If you're planning a sale and want the visuals tied to pricing and timing, visit Jacky Levi - Sotheby's Realty Advisor & Realtor to book a consultation and get a clear plan for your listing.
That's why professional real estate photography isn't a nice-to-have in this market. It's the front line of your marketing, and in a place with tight competition, cloudy weather, and buyers who live on Realtor.ca and MLS alerts, the visuals often decide whether you get showings or silence. The money you spend on photos is tiny compared with the money you lose when a listing sits. For Vancouver sellers, that's especially true because carrying costs are real, and time on market is expensive.
The First Weekend Online Decides the Listing
A North Vancouver owner lists on Thursday night, or a downtown condo seller goes live before the weekend, and the phone starts lighting up. Buyers have not toured the home yet. They have seen the hero image, the first shot in the gallery, and decided in seconds whether the place deserves a click. That first weekend matters because online shopping is how homes are browsed now, and the trend solidified in the 2010s, with NAR's Profile of Home Buyers and Sellers finding that 95% of buyers used the internet to search for homes. That shift turned listing photography into the thing that drives the first reaction, not the last one Matterport's summary of home-buying photography stats.
Sellers make a mistake when they treat the photo set like decoration. Professional real estate photography is a marketing asset that shapes clicks, showings, and the speed of the sale. Industry analysis consistently shows homes marketed with professional photos sell 32% faster than homes with standard images, often moving from about 123 days on market to 89 days, and properties in the $200,000 to $1 million range can close for $3,400 to $11,200 more when photographed professionally Matterport's summary of home-buying photography stats. For a Vancouver seller, even two extra weeks on market can hurt, because carrying costs are real and patience gets expensive fast.
The first weekend is also when you decide what kind of package to order, whether drone or twilight belongs on the brief, and how hard the home needs to be prepared before the photographer arrives. If you want the process broken down step by step, the listing workflow outlined in the process overview is a good reference point. The core idea stays the same. Your launch photos have to earn attention immediately, because after the first days of exposure, interest drops and the listing starts working against you instead of for you.
Professional listing photography is a sales tool, not decoration. It is a disciplined process that makes a property look accurate, bright, and easy to understand in a few seconds. A phone snapshot can show a room. A professional set shows scale, flow, light, and finish in a way that helps buyers picture how the home lives.
For a Greater Vancouver listing, that difference matters immediately. In a market shaped by constant online browsing, a buyer often decides whether to book a showing before they ever speak to an agent. The right images do not dress up a weak property. They present the home clearly, with enough polish to earn a click and enough accuracy to avoid disappointment at the showing.
A handwritten menu and a polished restaurant menu may list the same food, but the second one makes people trust what they are about to order faster.
The first thing buyers notice is consistent lighting. The second is straight verticals. The third is colour accuracy. If walls shift from yellow to blue between rooms, or if cabinet lines tilt because the camera was held poorly, the listing starts to feel careless. That is not a minor technical issue. It signals that the presentation has been rushed, and buyers read that as a warning about the rest of the property.
Professional real estate photography in this market also has to account for Vancouver conditions. Cloud cover, compact condos, narrow townhomes, and tight interior layouts all demand a photographer who knows how to work with limited light and limited space. The goal is not to make every home look like a luxury penthouse. The goal is to show the property accurately, while using framing, exposure, and composition to make the space read well on a screen.
That is why professional photography holds its value. It converts online attention into in-person interest. Sellers who still treat the photo set as a nice extra are usually the ones leaving money on the table, because the listing never gets the same first look as the better-presented homes nearby.
"Practical rule: if your first three photos do not make buyers stop scrolling, the rest of the listing barely matters."
The first weekend is also when you decide what kind of package to order, whether drone or twilight belongs on the brief, and how hard the home needs to be prepared before the photographer arrives. If you want the process broken down step by step, the listing workflow outlined in the process overview is a good reference point. The core idea stays the same. Your launch photos have to earn attention immediately, because after the first days of exposure, interest drops and the listing starts working against you instead of for you.
What Professional Real Estate Photography Is
Professional listing photography is a sales tool, not decoration. It is a disciplined process that makes a property look accurate, bright, and easy to understand in a few seconds. A phone snapshot can show a room. A professional set shows scale, flow, light, and finish in a way that helps buyers picture how the home lives.
For a Greater Vancouver listing, that difference matters immediately. In a market shaped by constant online browsing, a buyer often decides whether to book a showing before they ever speak to an agent. The right images do not dress up a weak property. They present the home clearly, with enough polish to earn a click and enough accuracy to avoid disappointment at the showing.
A handwritten menu and a polished restaurant menu may list the same food, but the second one makes people trust what they are about to order faster.
"A listing photo should make a home look like the home feels in person, not like a magazine spread."
The first thing buyers notice is consistent lighting. The second is straight verticals. The third is colour accuracy. If walls shift from yellow to blue between rooms, or if cabinet lines tilt because the camera was held poorly, the listing starts to feel careless. That is not a minor technical issue. It signals that the presentation has been rushed, and buyers read that as a warning about the rest of the property.
Professional real estate photography in this market also has to account for Vancouver conditions. Cloud cover, compact condos, narrow townhomes, and tight interior layouts all demand a photographer who knows how to work with limited light and limited space. The goal is not to make every home look like a luxury penthouse. The goal is to show the property accurately, while using framing, exposure, and composition to make the space read well on a screen.
That is why professional photography holds its value. It converts online attention into in-person interest. Sellers who still treat the photo set as a nice extra are usually the ones leaving money on the table, because the listing never gets the same first look as the better-presented homes nearby.
Services and Deliverables Most Vancouver Listings Need
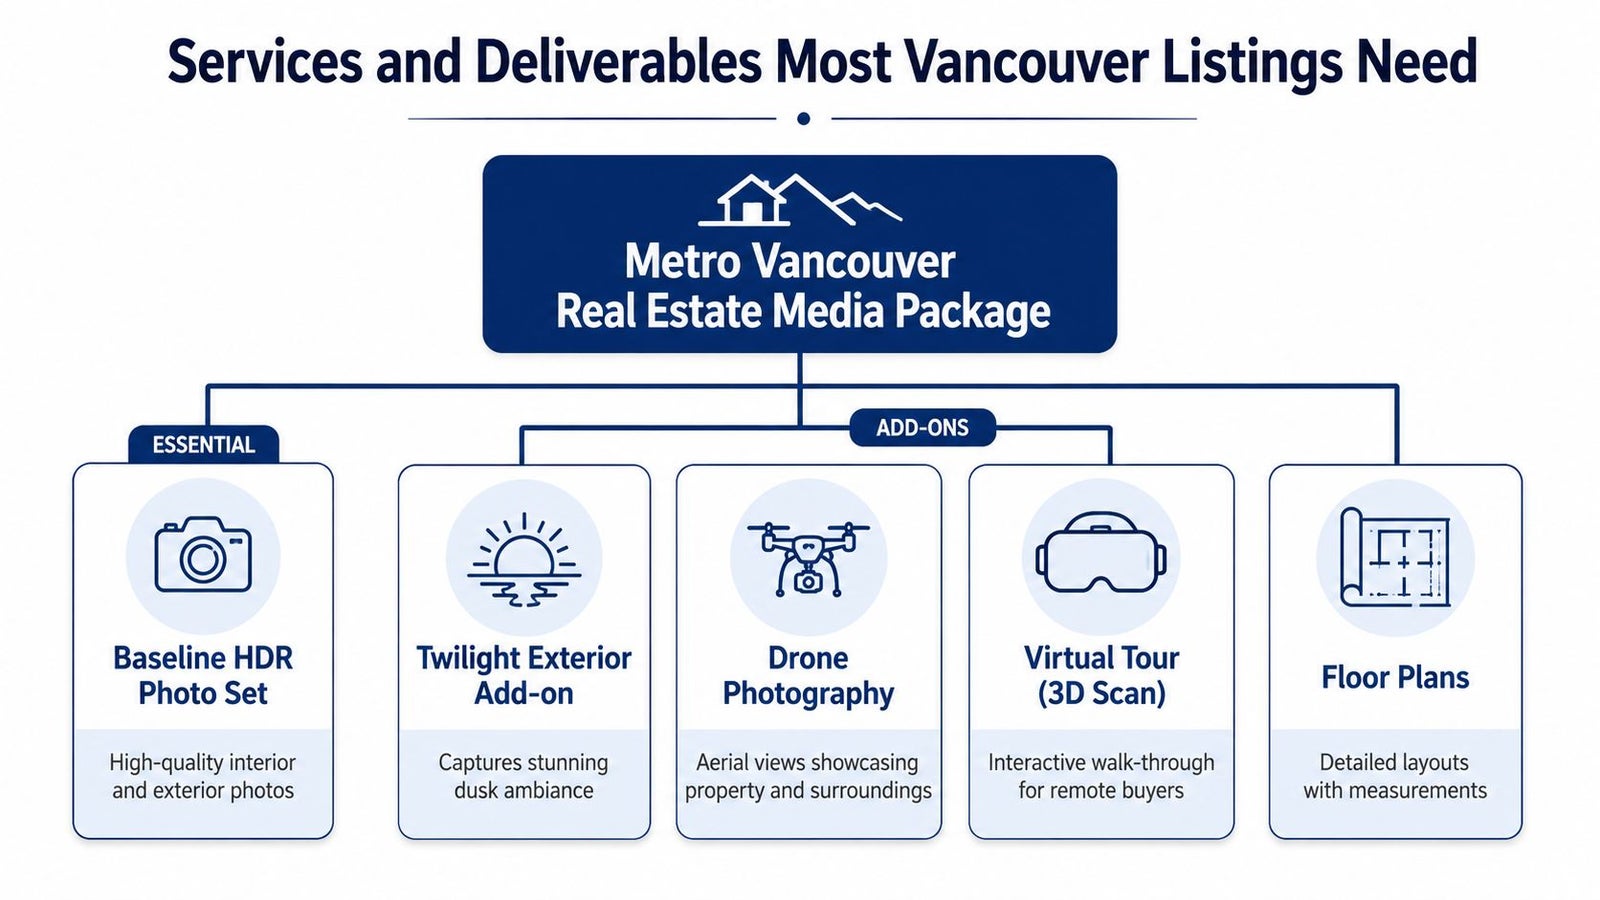
A solid Metro Vancouver media package usually starts with a baseline HDR photo set. That's the core deliverable for almost every listing, because buyers need clear, balanced interior and exterior images before they need anything flashy. Use it when the property is straightforward, occupied, and you want the listing to feel polished without overproducing it.
For luxury homes, waterfront properties, or anything that leans on atmosphere, a twilight exterior add-on can be worth it. Use it when the home has lighting, landscaping, or a setting that looks better at dusk than in midday cloud cover. Twilight works because it creates mood, but it's not a substitute for strong daytime interiors.
Drone imagery belongs on detached homes with land, views, rooflines, or a setting that adds value from above. Use it when the lot, the outlook, or the neighbourhood context helps explain the asset. For many Vancouver condos, drone shots are unnecessary noise. For a West Vancouver home with ocean context, they're a smart add.
Video tours and 3D walkthroughs are strongest for relocating buyers, out-of-town purchasers, and anyone who wants a better sense of flow before booking a visit. Use them when your buyer pool is likely to be remote or when the layout is unusual. A compact condo gains credibility from a clean walkthrough because it clearly shows the rooms.
Virtual staging is the practical choice for vacant condos and townhomes. Use it when empty rooms look smaller than they feel, but you don't want the cost or hassle of physical staging. It's especially useful when the space is already clean, bright, and well-finished, and you just need context.
For budgeting, Vancouver pricing depends on square footage, location, and add-ons, so exact quotes vary. Zillow notes that professional photography is commonly priced at $300 to $600, and it also recommends a practical listing gallery range of 22 to 27 photos Zillow's real estate photography tips. That's a sensible benchmark for sellers who want to know whether they're paying for a lean package or a complete marketing set.
The best vendors bundle these services, which simplifies scheduling, keeps the visual style consistent, and avoids the mess of hiring three different suppliers for one listing.
For luxury homes, waterfront properties, or anything that leans on atmosphere, a twilight exterior add-on can be worth it. Use it when the home has lighting, landscaping, or a setting that looks better at dusk than in midday cloud cover. Twilight works because it creates mood, but it's not a substitute for strong daytime interiors.
Drone imagery belongs on detached homes with land, views, rooflines, or a setting that adds value from above. Use it when the lot, the outlook, or the neighbourhood context helps explain the asset. For many Vancouver condos, drone shots are unnecessary noise. For a West Vancouver home with ocean context, they're a smart add.
Video tours and 3D walkthroughs are strongest for relocating buyers, out-of-town purchasers, and anyone who wants a better sense of flow before booking a visit. Use them when your buyer pool is likely to be remote or when the layout is unusual. A compact condo gains credibility from a clean walkthrough because it clearly shows the rooms.
Virtual staging is the practical choice for vacant condos and townhomes. Use it when empty rooms look smaller than they feel, but you don't want the cost or hassle of physical staging. It's especially useful when the space is already clean, bright, and well-finished, and you just need context.
For budgeting, Vancouver pricing depends on square footage, location, and add-ons, so exact quotes vary. Zillow notes that professional photography is commonly priced at $300 to $600, and it also recommends a practical listing gallery range of 22 to 27 photos Zillow's real estate photography tips. That's a sensible benchmark for sellers who want to know whether they're paying for a lean package or a complete marketing set.
The best vendors bundle these services, which simplifies scheduling, keeps the visual style consistent, and avoids the mess of hiring three different suppliers for one listing.
The Technical Workflow Behind the Final Image
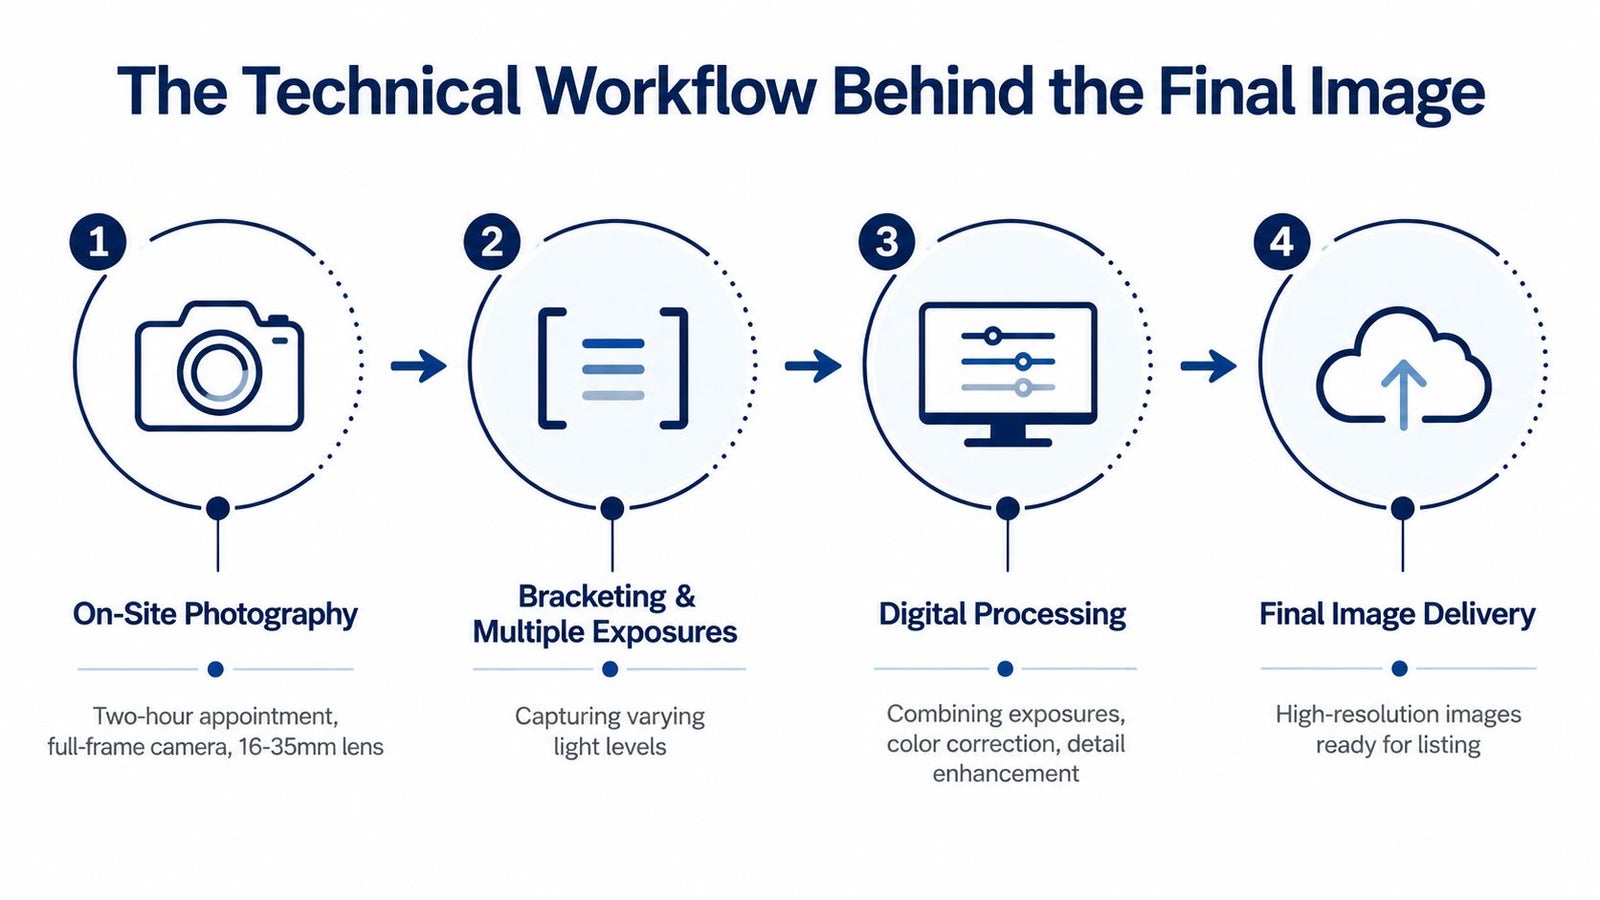
Shoot day looks simple from the curb. A photographer shows up with gear, moves through the home, and sends polished images later. Its value sits in the workflow behind those files, because the choices made at capture and in post determine whether a listing looks bright, accurate, and worth a buyer's click. In Greater Vancouver, that matters even more, because overcast light, narrow floor plans, and tight room layouts punish sloppy shooting fast.
For interiors, the standard setup is a full-frame camera, a wide-angle lens in the 16 to 24 mm range, a sturdy tripod, and RAW capture. Interior shutter speeds often fall between 1/15 s and 2 s, which makes handheld shooting a poor choice if you want clean files with low noise. ISO also needs to stay below about 400 for the best result, so the tripod is part of the system, not an extra Snappr's real estate photography guide.
That setup does three jobs at once. It keeps the image sharp, preserves detail in darker corners, and prevents the verticals from leaning. The same workflow usually uses bracketed exposures of three to five frames at roughly 2 EV intervals, so the photographer can merge bright window areas and shadow detail into one balanced picture, as covered in Snappr's real estate photography guide.
A phone shot in mixed light usually gives you blown-out windows and muddy hallways. A professional HDR workflow keeps the window view, holds texture in the cabinets, and gives buyers enough brightness to trust what they are seeing. In Vancouver, that matters because many homes face overcast skies, tree cover, or deep interior layouts that swallow natural light. Buyers here notice bad exposure immediately, and they read it as careless marketing.
That is why a real photo package costs more than a quick snapshot session. The photographer is combining exposure control, lens choice, and post-production into one consistent visual result, and that consistency is what makes a listing look ready for market.
Start with where serious Vancouver agents source media. Referrals from trusted colleagues, vendor lists, and brokerages with strict listing standards usually point you toward photographers who understand how a home needs to read online. If a team already shoots for agencies that care about presentation, that usually shows in the portfolio, especially on larger homes and multi-room galleries. A Sotheby's International Realty-affiliated example of a media presence is Axion Creative, but the test is still the work on screen.
Skip the pretty exteriors unless the full gallery holds up. Open every sample listing and check whether exposure stays steady from room to room, whether the vertical lines are straight, and whether the window detail is clean instead of blown out. If the photographer shows twilight shots or drone work, make sure those images match the property types they claim to cover.
A luxury detached home and a compact condo need different treatment. A photographer who can handle both without making the condo feel cramped or the house feel flat belongs on your shortlist.
The gear choices that matter
For interiors, the standard setup is a full-frame camera, a wide-angle lens in the 16 to 24 mm range, a sturdy tripod, and RAW capture. Interior shutter speeds often fall between 1/15 s and 2 s, which makes handheld shooting a poor choice if you want clean files with low noise. ISO also needs to stay below about 400 for the best result, so the tripod is part of the system, not an extra Snappr's real estate photography guide.
That setup does three jobs at once. It keeps the image sharp, preserves detail in darker corners, and prevents the verticals from leaning. The same workflow usually uses bracketed exposures of three to five frames at roughly 2 EV intervals, so the photographer can merge bright window areas and shadow detail into one balanced picture, as covered in Snappr's real estate photography guide.
Why the difference is obvious to buyers
A phone shot in mixed light usually gives you blown-out windows and muddy hallways. A professional HDR workflow keeps the window view, holds texture in the cabinets, and gives buyers enough brightness to trust what they are seeing. In Vancouver, that matters because many homes face overcast skies, tree cover, or deep interior layouts that swallow natural light. Buyers here notice bad exposure immediately, and they read it as careless marketing.
"Bottom line: the camera is only half the job. Light has to be controlled so the room reads correctly."
That is why a real photo package costs more than a quick snapshot session. The photographer is combining exposure control, lens choice, and post-production into one consistent visual result, and that consistency is what makes a listing look ready for market.
How to Choose the Right Photographer in Greater Vancouver
Start with where serious Vancouver agents source media. Referrals from trusted colleagues, vendor lists, and brokerages with strict listing standards usually point you toward photographers who understand how a home needs to read online. If a team already shoots for agencies that care about presentation, that usually shows in the portfolio, especially on larger homes and multi-room galleries. A Sotheby's International Realty-affiliated example of a media presence is Axion Creative, but the test is still the work on screen.
What to inspect in the portfolio
Skip the pretty exteriors unless the full gallery holds up. Open every sample listing and check whether exposure stays steady from room to room, whether the vertical lines are straight, and whether the window detail is clean instead of blown out. If the photographer shows twilight shots or drone work, make sure those images match the property types they claim to cover.
A luxury detached home and a compact condo need different treatment. A photographer who can handle both without making the condo feel cramped or the house feel flat belongs on your shortlist.
Questions to ask before you book
- How fast is turnaround? Whether the photos arrive quickly enough to support your launch date.
- How many images are included? Whether the package gives you enough coverage without paying for fluff
- Are MLS-sized and full-resolution files included? Whether you can upload properly and reuse images for print or social.
- Do you handle drone work in-house? Whether the operator has the right credentials and process
What happens if weather ruins the exterior shoot? Whether reshoots are included or charged separately
Weather matters in Vancouver more than sellers like to admit. Cloud cover, rain, and short winter daylight make flexible scheduling a requirement, and HDR interiors are required in that environment. A photographer who cannot adjust around the forecast will cost you launch momentum.
Also, get usage rights in writing. The brief controls where you can use the images, and that matters for MLS, Realtor.ca, social media, and print. A clear brief protects you later, especially if you want to reuse the gallery across multiple channels.
At 8 a.m. in North Vancouver, a properly prepped detached home looks calm before the photographer even walks in. The bins are gone from the front, the cars are parked down the street, the entry light is on, and the kitchen counters look like somebody lives there without leaving everything out. By contrast, a downtown Vancouver condo can go from cramped to clean in half an hour if the prep is tight and nobody wastes space on clutter.
Also, get usage rights in writing. The brief controls where you can use the images, and that matters for MLS, Realtor.ca, social media, and print. A clear brief protects you later, especially if you want to reuse the gallery across multiple channels.
"Ask for the terms before you ask for the first photo."
Preparing the Home for Shoot Day
At 8 a.m. in North Vancouver, a properly prepped detached home looks calm before the photographer even walks in. The bins are gone from the front, the cars are parked down the street, the entry light is on, and the kitchen counters look like somebody lives there without leaving everything out. By contrast, a downtown Vancouver condo can go from cramped to clean in half an hour if the prep is tight and nobody wastes space on clutter.
The room-by-room routine
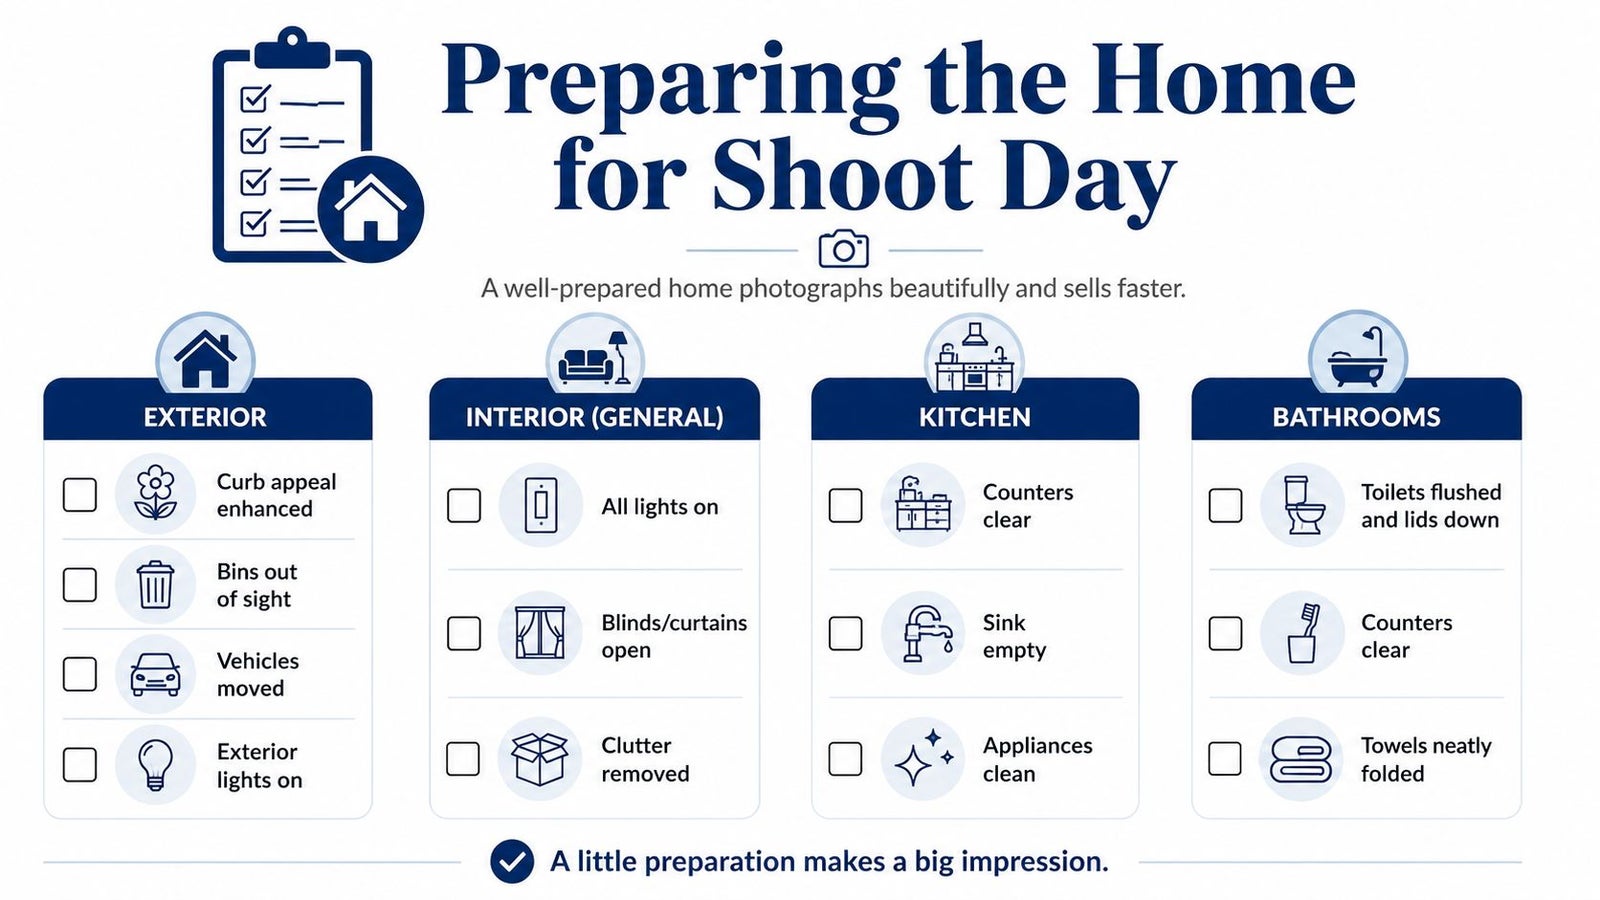
Outside first. Curb appeal enhanced, bins out of sight, vehicles moved, and exterior lights on. Those four items do more than a decorative sweep, they set the tone before the buyer scrolls to the next photo.
Inside, keep it simple. All lights on, blinds and curtains open, and clutter removed from every visible surface. In the kitchen, counters clear, sink empty, and appliances clean. In bathrooms, toilets flushed and lids down, counters clear, and towels neatly folded.
Bedrooms need special discipline because they show badly when they're half-done. Make the beds properly, tuck away cords, and use soft neutral linens if you've got them. Turn off televisions, hide remotes, and remove anything personal that pulls attention away from the room itself.
Why this matters more in tighter spaces
A two-bedroom condo in downtown Vancouver has less margin for error than a detached house. One stray backpack, one drying rack, or one overloaded counter can make the space feel smaller on camera than it does in person. That's not a photographer problem; it's a prep problem.
The best way to manage it is to assign the prep to specific people. One person handles the exterior, one handles the kitchen and bathrooms, and one walks through the home with a final eye for odd items that didn't get put away. If you want a practical seller timeline, the prep sequence in this Vancouver house-sale guide is a useful reference.
Cleaners should go in the morning, the stager mid-day if you're using one, and the photographer later in the afternoon for exteriors. In BC weather, twilight exteriors may need to wait for the next clear evening. That delay is annoying, but it's better than forcing a bad shot because the sky won't cooperate.
When the Wide-Angle Trick Backfires on a Listing
The old advice says wider is always better. In Metro Vancouver, that's wrong often enough to hurt you. A lens can make a room look bigger, but if it stretches doorways, distorts corners, and turns a small condo into something that feels fake, experienced buyers notice immediately.
Spaciousness versus authenticity
A 700 sq ft Yaletown condo benefits from honest mid-wide framing that shows layout without exaggeration. A 3,200 sq ft West Vancouver detached can carry a wider look because the room scale and property type can support it. That difference matters because buyers are comparing listings side by side, and trust usually wins more showings than a photo that feels slightly larger but a bit off.
The problem with aggressive ultra-wide shooting is simple. It can make rooms feel inflated, but it can also trigger skepticism, especially in condos and townhomes where buyers already know the floor plans are compact. If the hallway looks longer than it is or the bedroom door frame bends, the buyer stops trusting the set.
A practical rule that actually works
Use the widest angle you need to show flow, then include at least one eye-level reference shot in each room. That gives buyers a sense of scale without overpromising space. It also helps the listing feel grounded, which is exactly what higher-intent buyers want when they're comparing three or four similar homes in the same neighbourhood.
"Shoot wide enough to show the room, not so wide that the room starts feeling dishonest."
The right answer depends on the property. For a townhouse with a narrow main floor, a measured framing choice keeps the living area believable. For a larger detached home with open sightlines, a bit more width is fine because the structure can support it. The goal isn't to chase the biggest-looking image, it's to make the layout understandable and credible.
Your Next Step With a Greater Vancouver Listing
Before you book anything, make three decisions. Pick the package that fits the property type, choose a Vancouver media team that can handle weather reschedules, and prepare the home using a checklist instead of guessing on the morning of the shoot. That's the difference between a listing that launches cleanly and one that needs fixing later.
Use a one-page listing photography brief for every property. It should cover shot count, deliverables, usage rights, and timeline, and it should go to any photographer you're considering before the booking is confirmed. That brief keeps everyone aligned and stops vague promises from becoming expensive misunderstandings.
For sellers who want a wider marketing plan, the broader strategy framework in this Vancouver marketing guide is worth reading alongside your photo plan. Photography works best when it supports the pricing, timing, and launch sequence, not when it's ordered in isolation.
If you're selling in Vancouver, North Vancouver, Burnaby, Richmond, or on the Westside, book a listing consultation that includes photography, drone, twilight, and 3D walkthrough options matched to your property. The consultation should also include a comparable-sales and marketing review so the visual strategy fits the price and the timing, not just the camera budget.
Jacky Levi - Sotheby's Realty Advisor & Realtor offers listing strategy, marketing execution, and hands-on seller guidance across Greater Vancouver, including photography, video, and property presentation. If you're planning a sale and want the visuals tied to pricing and timing, visit Jacky Levi - Sotheby's Realty Advisor & Realtor to book a consultation and get a clear plan for your listing.