
You're three weeks from photos, the kitchen still has a dated light fixture, the primary bedroom is full of storage bins, and your agent keeps asking when the home will be ready. That's a normal Vancouver seller problem, and it's exactly where sellers get it wrong. The winning move isn't frantic cleaning the night before the photographer arrives, it's treating how to prepare house for sale like a timed project with hard priorities, a budget, and a clear launch date.
This is when the big decisions happen. Book the pre-listing inspection first, then decide what gets repaired and what gets left alone. That order matters because inspection findings tell you where buyer objections are likely to show up, and you don't want to stage around hidden problems. The seller who skips this step often ends up doing expensive rework after the home is already half-prepared.
If the property is a detached house, focus first on systems, leaks, drainage, worn paint, and anything that a buyer's own inspection will expose later. If it's a condo or townhome, concentrate on visible maintenance, aging fixtures, storage presentation, and any strata-related paperwork your agent needs. Do not start with décor. Start with anything that could affect confidence.
This is the main execution window for repairs, decluttering, and depersonalising. Once the repair list is final, clear out excess furniture, bulky items, and anything that makes rooms feel smaller than they are. Then deep clean. Not before. Cleaning a cluttered home is wasted effort because the clutter still reads as crowding in photos and showings.
Book the stager and photographer once the home is nearly ready, not when it's still a worksite. Sellers often ask whether they should stage before or after repairs. After, every time. If painters, handymen, or cleaners are still coming and going, the media day will need to be repeated or compromised.
Now the house should be presentation-ready. Confirm photography, video, and any 3D tour work. I'd also confirm the launch materials, because the best-selling listings don't wing the final week. A prepared seller has clean rooms, working lights, fresh linens, tidy storage, and no loose repairs waiting on parts.
If you want an example of a structured marketing workflow, use this Vancouver seller resource as a reference point for timing and coordination. The point isn't to memorise a calendar. The point is to stop treating prep like a last-minute scramble.
These rooms need space and calm. Pull furniture away from walls where possible, remove oversized pieces that choke the room, and keep the décor neutral enough that a stranger can mentally move in. Bedrooms should look restful, not occupied. That means tight bed-making, simple bedding, and no personal clutter on nightstands.
Closets matter more than sellers expect. Vancouver buyers, especially condo buyers, are sensitive to storage. A full closet reads as a space problem even when the square footage is fine. Empty enough of it to prove the home can hold real life without looking crowded.
The entry sets the tone. A clean mat, working lights, a swept threshold, and a clear path inside are basic, not optional. Laundry rooms should look functional, dry, and tidy, even if they're small. Storage areas should be organised enough that buyers can see the floor and understand the usable space.
For detached homes, the garage and exterior storage are part of the show. For condos and townhomes, the locker, pantry, and utility closet deserve the same discipline. A buyer who sees organised storage assumes the rest of the home has been handled with equal care.

The biggest mistake sellers make is confusing a better home with a more expensive one. You do not need a renovation campaign to sell well in Greater Vancouver. You need a clean, neutral, presentable home that doesn't hand buyers a list of excuses. That's a different job.
Decluttering, deep cleaning, minor repairs, neutral paint, and staging usually do more for a listing than a major kitchen or bathroom overhaul. That's especially true in condos and townhomes, where space efficiency and showing readiness carry more weight than full-scale remodel work. A buyer will forgive a basic kitchen if the home feels clean, bright, and easy to live in. They won't forgive a messy, over-improved home that still reads tired.
High-priority, lower-cost improvements
Low-priority, higher-cost projects to usually skip
A simple way to decide is to ask whether the project improves how the home photographs, functions, or feels during a showing. If it does, it may be worth doing. If not, leave it alone.
Use the table as a filter, not a shopping list. If a project doesn't improve how the home photographs, functions, or feels during a showing, leave it alone. That's especially true in detached homes, where maintenance costs can stack up fast and eat into sale preparation budgets. If you want a sobering reminder of how ongoing upkeep adds up, this Vancouver detached-home maintenance guide is worth reviewing before you authorise a vanity project.
My rule is simple. Spend on anything that removes doubt. Skip anything that merely expresses taste.
Some listings need more than tidy rooms. A busy road, weak view, transit noise, awkward exposure, or neighbourhood perception can shape a buyer's view before they even cross the threshold. In those cases, cosmetic prep alone won't save you. You need tactical positioning.
Be upfront about the issue, then control the conversation. If the location is noisy, make sure the home is presented with quiet, comfortable interior moments. If privacy is limited, use window treatments and landscaping to show how the property handles it. If the view is the weak point, direct attention toward light, layout, storage, and the strength of the interior spaces instead of pretending the outlook doesn't exist.
The pricing conversation matters here too. A realistic price gives buyers less reason to keep hunting for flaws. A home that is well-positioned and cleanly presented will usually create less friction than one that tries to hide a known weakness behind generic staging.
A longer timeline may be necessary. Location-challenged homes often need more patience and more precise marketing because the appeal is narrower. That doesn't mean the property is hard to sell. It means the prep needs to be more deliberate, and the listing story needs to focus on what the home does well rather than what the address can't change.
Jacky Levi - Sotheby's Realty Advisor & Realtor offers Greater Vancouver sellers practical listing preparation, vendor coordination, pricing strategy, and marketing support for condos, townhomes, and detached homes. If you want a sharper plan for how to prepare your house for sale, visit Jacky Levi - Sotheby's Realty Advisor & Realtor and book a conversation before you set your list date.
In Greater Vancouver, preparation is not cosmetic fluff. It's how you protect price, reduce buyer friction, and avoid a listing that sits awkwardly because the home went live before it was ready. The practical sell-prep window is often 4 to 6 weeks before listing, because that gives you time for inspection fixes, deep cleaning, and cosmetic updates before photos and showings begin, while staging can influence both buyer perception and pricing power as seller-prep guidance notes. If you want a cleaner route from prep to closing, follow the process from the beginning, not in reverse. The overall selling timeline can average about 86 days from preparation through closing, with 51 days on market plus 35 days for closing, and pre-listing work alone can stretch from 2 weeks to 3 months depending on repairs, staging, and paperwork according to Zillow's seller guidance. If you want a practical sequence to follow, start with the process overview and work backwards from your target list date.
Why Preparation Timing Matters More Than You Think
A lot of sellers judge readiness by how the home looks on a Saturday afternoon. That is too late. Readiness means the place is repaired, cleared, cleaned, staged, documented, and photo-ready before buyers see it online. In Greater Vancouver, buyers scan listings fast, compare them side by side, and punish any launch that looks rushed. Sloppy photos, unfinished repairs, and awkward pricing pressure all start with poor timing.
The better approach is to treat prep as a pricing and positioning decision. Staging matters because it helps buyers picture the home properly, and staged homes can sell for more than unstaged ones. That does not mean every property needs a full redesign. It means the home needs to read as cared for, easy to live in, and worth a closer look. In a market like Vancouver, condition and timing affect buyer response as much as the asking price.
"Practical rule: if a repair, clean-up, or staging decision would embarrass you in listing photos, it is not ready for market."
Sellers get into trouble when the listing date is fixed too early. Repairs then get rushed, cleaning gets half-finished, and the photo shoot happens before the home looks settled. Buyers notice shortcuts immediately, especially in condos, townhomes, and detached homes where presentation standards are high and competition is constant. A better sequence gives you time to fix problems before they become objections, and it lets your agent choose a stronger launch window instead of forcing a weak one. If you want the process mapped out from prep to sale day, start with the process overview and work backwards from your target list date.
That is why I tell sellers to start sooner than they think. The goal is not to do extra work for the sake of it. The goal is to spend time where it changes buyer perception and supports a stronger first week on market.
Your Pre-Listing Timeline and Milestone Schedule
Eight to twelve weeks out
This is when the big decisions happen. Book the pre-listing inspection first, then decide what gets repaired and what gets left alone. That order matters because inspection findings tell you where buyer objections are likely to show up, and you don't want to stage around hidden problems. The seller who skips this step often ends up doing expensive rework after the home is already half-prepared.
If the property is a detached house, focus first on systems, leaks, drainage, worn paint, and anything that a buyer's own inspection will expose later. If it's a condo or townhome, concentrate on visible maintenance, aging fixtures, storage presentation, and any strata-related paperwork your agent needs. Do not start with décor. Start with anything that could affect confidence.
Four to six weeks out
"Best sequence: inspection first, then repairs, then decluttering, then deep cleaning, then staging and photography."
Book the stager and photographer once the home is nearly ready, not when it's still a worksite. Sellers often ask whether they should stage before or after repairs. After, every time. If painters, handymen, or cleaners are still coming and going, the media day will need to be repeated or compromised.
Two to four weeks out
Now the house should be presentation-ready. Confirm photography, video, and any 3D tour work. I'd also confirm the launch materials, because the best-selling listings don't wing the final week. A prepared seller has clean rooms, working lights, fresh linens, tidy storage, and no loose repairs waiting on parts.
If you want an example of a structured marketing workflow, use this Vancouver seller resource as a reference point for timing and coordination. The point isn't to memorise a calendar. The point is to stop treating prep like a last-minute scramble.
Room-by-Room Preparation Checklist for Maximum Impact
Kitchen and bathrooms
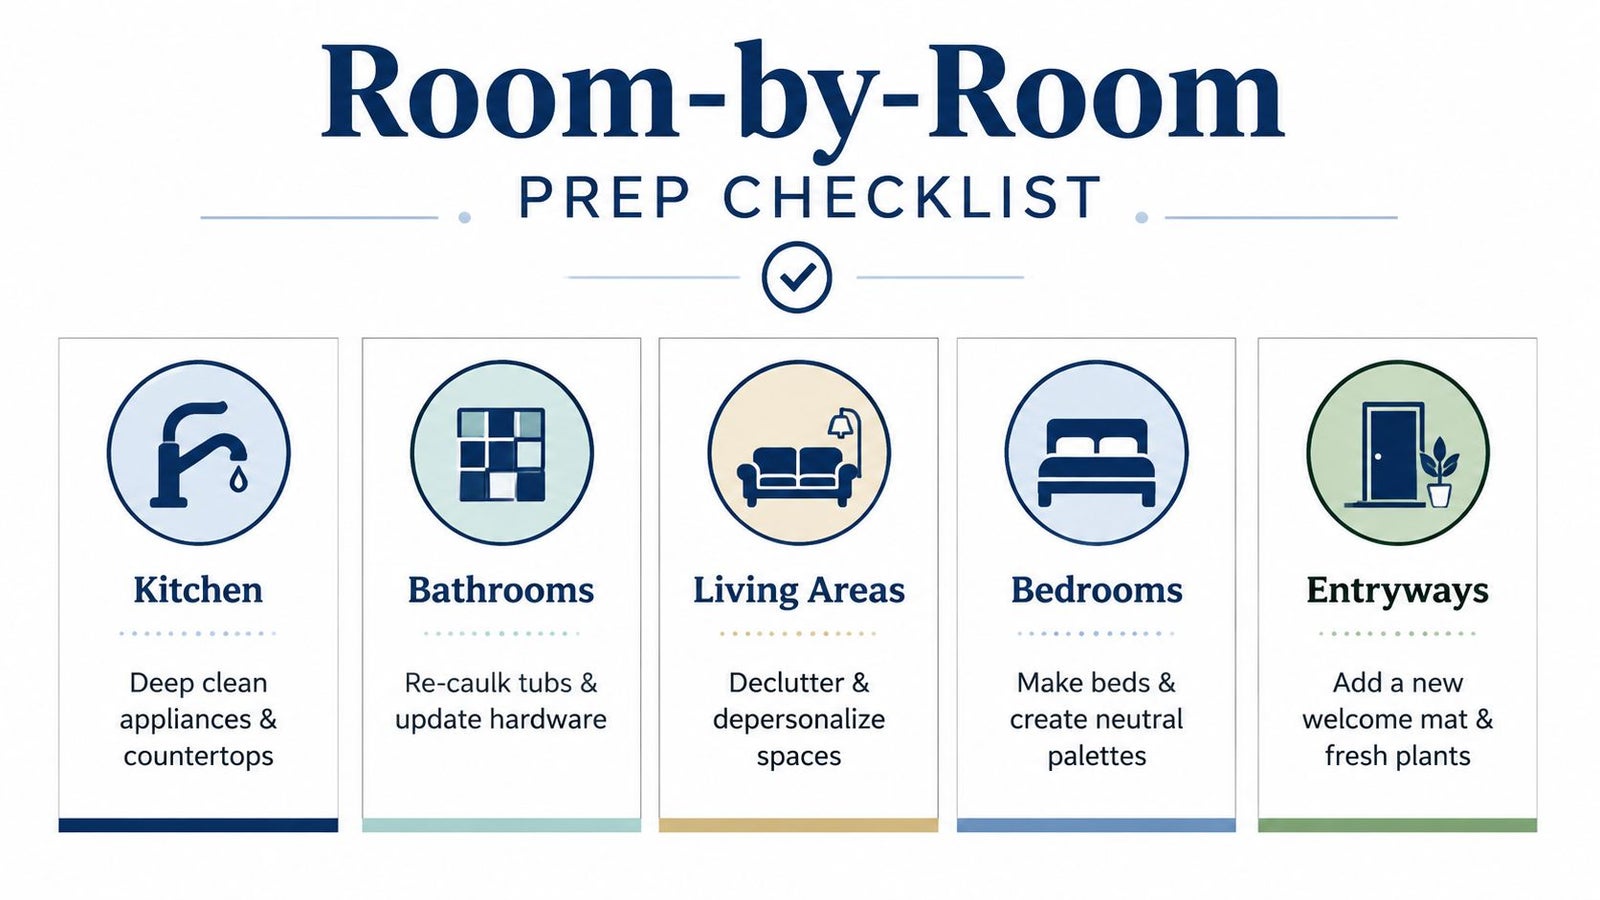
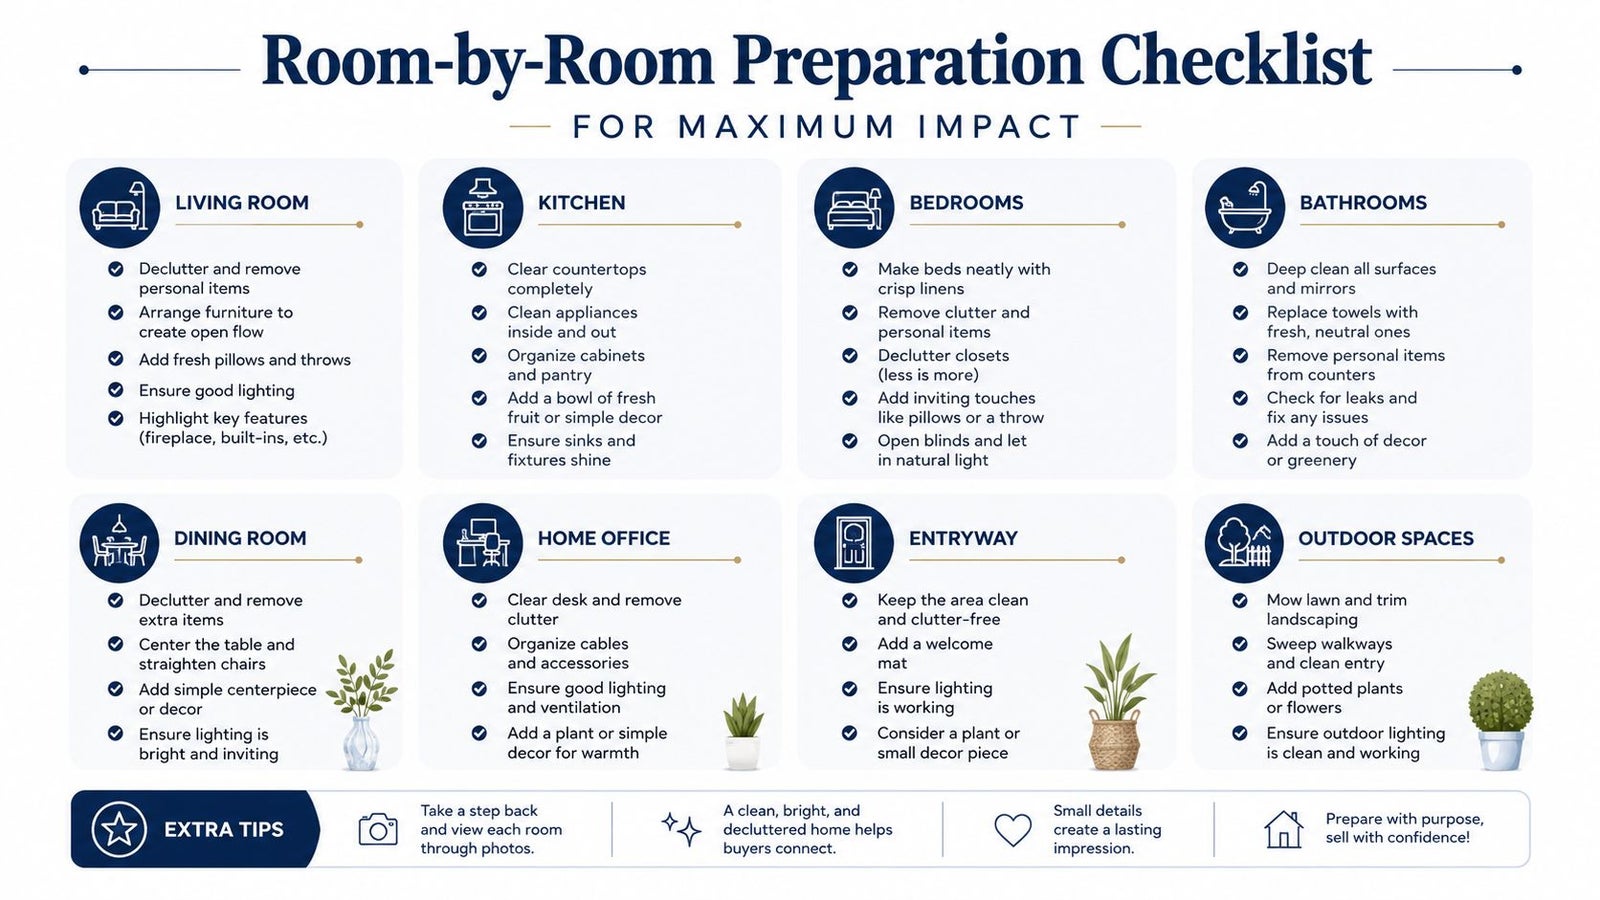
Start where buyers judge care the fastest. In the kitchen, clean appliances until they look used, not tired. Degrease the hood fan, wipe the inside of the oven, polish the sink, and clear the counters until only a few intentional items remain. If cabinet hardware is dated, crooked, or scratched, replace it. That's a small visual fix with outsized impact.n bathrooms, focus on grout, caulking, mirrors, and fixtures. Re-caulk where needed, swap tarnished hardware, and make the towels look hotel-clean. Buyers in Vancouver notice bathrooms fast because they signal whether the home has been maintained or lived in.
Living areas and bedrooms
These rooms need space and calm. Pull furniture away from walls where possible, remove oversized pieces that choke the room, and keep the décor neutral enough that a stranger can mentally move in. Bedrooms should look restful, not occupied. That means tight bed-making, simple bedding, and no personal clutter on nightstands.
Closets matter more than sellers expect. Vancouver buyers, especially condo buyers, are sensitive to storage. A full closet reads as a space problem even when the square footage is fine. Empty enough of it to prove the home can hold real life without looking crowded.
Entryways, laundry rooms, and storage spaces
The entry sets the tone. A clean mat, working lights, a swept threshold, and a clear path inside are basic, not optional. Laundry rooms should look functional, dry, and tidy, even if they're small. Storage areas should be organised enough that buyers can see the floor and understand the usable space.
For detached homes, the garage and exterior storage are part of the show. For condos and townhomes, the locker, pantry, and utility closet deserve the same discipline. A buyer who sees organised storage assumes the rest of the home has been handled with equal care.
Staging, Photography, and Curb Appeal That Sells
Professional presentation is where all the earlier work becomes visible. Staging helps buyers understand scale, flow, and function, which is why it matters even in smaller Vancouver homes where every square foot needs to work harder. If a home is vacant, cluttered, or awkwardly laid out, staging can solve problems that paint alone won't touch.
A seller should think about staging in the context of property type. Condos usually need space efficiency, cleaner lines, and fewer distractions. Townhomes need flow and practical family use. Detached homes can usually support more layered presentation, but they still need discipline. The point is not to decorate for the owner's taste, it's to make the room read clearly on camera and in person.
The same logic applies to photography and video. Shoot day should happen only after the home is fully ready, with lamps working, blinds opened consistently, cords hidden, surfaces cleared, and windows clean. If you're doing 3D walkthroughs, every room needs to be more honest, because the camera exposes what a casual walkthrough might hide. That matters for out-of-town buyers and relocation clients who may never visit twice before deciding.
Curb appeal still counts, even in a market where the interior sells the lifestyle. Tidy landscaping, clean entry points, a washed front door, and exterior surfaces free of grime help the home feel cared for before anyone steps inside. In Greater Vancouver, damp weather and overcast days make exterior upkeep look more obvious, not less. If you want a practical marketing baseline, this Vancouver seller marketing guide is the kind of support material that belongs in the planning stage, not after the photos are already taken.
A seller should think about staging in the context of property type. Condos usually need space efficiency, cleaner lines, and fewer distractions. Townhomes need flow and practical family use. Detached homes can usually support more layered presentation, but they still need discipline. The point is not to decorate for the owner's taste, it's to make the room read clearly on camera and in person.
The same logic applies to photography and video. Shoot day should happen only after the home is fully ready, with lamps working, blinds opened consistently, cords hidden, surfaces cleared, and windows clean. If you're doing 3D walkthroughs, every room needs to be more honest, because the camera exposes what a casual walkthrough might hide. That matters for out-of-town buyers and relocation clients who may never visit twice before deciding.
Curb appeal still counts, even in a market where the interior sells the lifestyle. Tidy landscaping, clean entry points, a washed front door, and exterior surfaces free of grime help the home feel cared for before anyone steps inside. In Greater Vancouver, damp weather and overcast days make exterior upkeep look more obvious, not less. If you want a practical marketing baseline, this Vancouver seller marketing guide is the kind of support material that belongs in the planning stage, not after the photos are already taken.
"Good listing media doesn't rescue a poor prep job. It exposes one."
A useful local option here is Jacky Levi - Sotheby's Realty Advisor & Realtor, which includes listing preparation and project management, along with professional photography, video tours, and 3D walkthrough coordination. That kind of support is useful when you want one person tracking the timing between cleaners, stagers, media, and launch day, rather than chasing four vendors yourself.
Which Upgrades Are Worth the Money and Which to Skip
The biggest mistake sellers make is confusing a better home with a more expensive one. You do not need a renovation campaign to sell well in Greater Vancouver. You need a clean, neutral, presentable home that doesn't hand buyers a list of excuses. That's a different job.
Decluttering, deep cleaning, minor repairs, neutral paint, and staging usually do more for a listing than a major kitchen or bathroom overhaul. That's especially true in condos and townhomes, where space efficiency and showing readiness carry more weight than full-scale remodel work. A buyer will forgive a basic kitchen if the home feels clean, bright, and easy to live in. They won't forgive a messy, over-improved home that still reads tired.
Smart pre-sale upgrades to prioritize
High-priority, lower-cost improvements
- Fresh neutral paint: low cost, strong visual lift, and broader buyer appeal.
- Cabinet hardware and fixture updates: low cost, but highly noticeable in photos and showings.
- Deep cleaning and professional detailing: low to moderate cost, with an immediate perception boost.
- Minor repairs: scratches, caulking, loose handles, and similar fixes are usually inexpensive and help reduce buyer objections.
Low-priority, higher-cost projects to usually skip
- Full kitchen remodel: high cost and often unnecessary before listing.
- Full bathroom remodel: high cost and rarely the best use of pre-sale budget.
- Major landscaping overhaul: high cost, and for many sellers it does not return enough to justify the spend.
A simple way to decide is to ask whether the project improves how the home photographs, functions, or feels during a showing. If it does, it may be worth doing. If not, leave it alone.
Use the table as a filter, not a shopping list. If a project doesn't improve how the home photographs, functions, or feels during a showing, leave it alone. That's especially true in detached homes, where maintenance costs can stack up fast and eat into sale preparation budgets. If you want a sobering reminder of how ongoing upkeep adds up, this Vancouver detached-home maintenance guide is worth reviewing before you authorise a vanity project.
My rule is simple. Spend on anything that removes doubt. Skip anything that merely expresses taste.
Preparing Homes With Location Challenges
Some listings need more than tidy rooms. A busy road, weak view, transit noise, awkward exposure, or neighbourhood perception can shape a buyer's view before they even cross the threshold. In those cases, cosmetic prep alone won't save you. You need tactical positioning.
Be upfront about the issue, then control the conversation. If the location is noisy, make sure the home is presented with quiet, comfortable interior moments. If privacy is limited, use window treatments and landscaping to show how the property handles it. If the view is the weak point, direct attention toward light, layout, storage, and the strength of the interior spaces instead of pretending the outlook doesn't exist.
The pricing conversation matters here too. A realistic price gives buyers less reason to keep hunting for flaws. A home that is well-positioned and cleanly presented will usually create less friction than one that tries to hide a known weakness behind generic staging.
"Buyers can forgive a limitation. They don't forgive feeling misled."
A longer timeline may be necessary. Location-challenged homes often need more patience and more precise marketing because the appeal is narrower. That doesn't mean the property is hard to sell. It means the prep needs to be more deliberate, and the listing story needs to focus on what the home does well rather than what the address can't change.
Your Final Checklist and Next Steps to List With Confidence
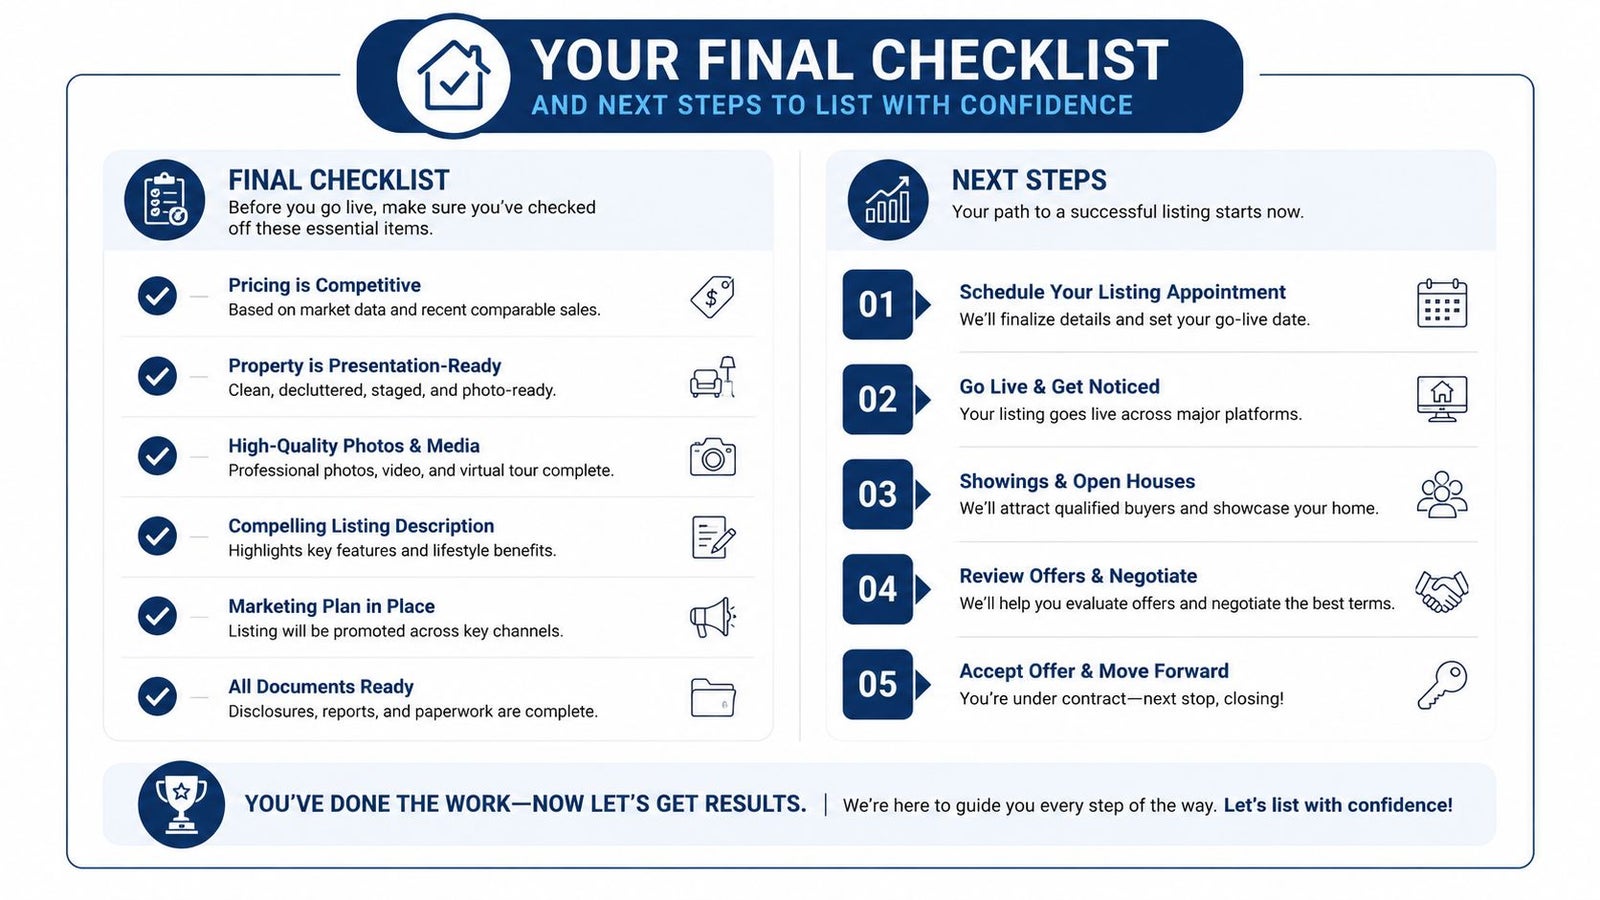
The last week before listing should feel controlled, not frantic. Check every bulb, run every tap, open every blind, and make sure the home smells neutral and clean. Then do a final walk-through with the same mindset a buyer will have, sharp, unsentimental, and slightly suspicious. If something looks unfinished, fix it now.
Pull together the paperwork too. Gather repair invoices, permits, warranties, and any documents tied to known defects or completed work. In British Columbia, sellers need to treat condition disclosure seriously, and the Property Disclosure Statement is part of that process for many listings, along with clear disclosure of known issues that could affect a buyer's decision, as consumer property guidance explains. Truthful reporting is part of the sale process, not an afterthought, and hidden problems create distrust fast.
Your next move is a listing agent who can manage the prep timeline, not just talk about enthusiasm. Ask how they coordinate vendors, how they sequence photography and staging, and how they want the home ready before launch. Sellers who get those answers early avoid the scramble that usually shows up at the worst possible time.
If you are ready to prepare your home the right way, start now, not the week before photos. Good prep protects your price, makes your listing look stronger, and gives you a smoother path to closing.
Pull together the paperwork too. Gather repair invoices, permits, warranties, and any documents tied to known defects or completed work. In British Columbia, sellers need to treat condition disclosure seriously, and the Property Disclosure Statement is part of that process for many listings, along with clear disclosure of known issues that could affect a buyer's decision, as consumer property guidance explains. Truthful reporting is part of the sale process, not an afterthought, and hidden problems create distrust fast.
Your next move is a listing agent who can manage the prep timeline, not just talk about enthusiasm. Ask how they coordinate vendors, how they sequence photography and staging, and how they want the home ready before launch. Sellers who get those answers early avoid the scramble that usually shows up at the worst possible time.
If you are ready to prepare your home the right way, start now, not the week before photos. Good prep protects your price, makes your listing look stronger, and gives you a smoother path to closing.
Jacky Levi - Sotheby's Realty Advisor & Realtor offers Greater Vancouver sellers practical listing preparation, vendor coordination, pricing strategy, and marketing support for condos, townhomes, and detached homes. If you want a sharper plan for how to prepare your house for sale, visit Jacky Levi - Sotheby's Realty Advisor & Realtor and book a conversation before you set your list date.